Rafts are instrumental in improving first-layer adhesion and preventing warping, especially if you have an unheated print bed. However, you may not need a large raft if there are no adhesion issues, a model is too small, or you want to use less filament.
You can reduce a 3D print raft size in Cura by changing the build plate adhesion settings. Reducing the raft dimensions and altering the raft’s default extra margin will reduce your raft size. If necessary and viable, you can also review the number of top layers of the raft for a 3D design.
So, let’s discuss the proper method for adjusting your 3D print’s raft size in Cura. These methods should work for you irrespective of the source of a 3D print design.
1. Reduce Raft Dimensions in Cura Adhesion Settings
The easiest, best way to change the size of your 3D print’s raft is to change the raft settings in Cura.
You are probably familiar with various print settings available in Cura, including but not limited to the following:
- Cooling
- Dual extrusion
- Infill
- Material
- Speed
- Support
- Travel
- Wall
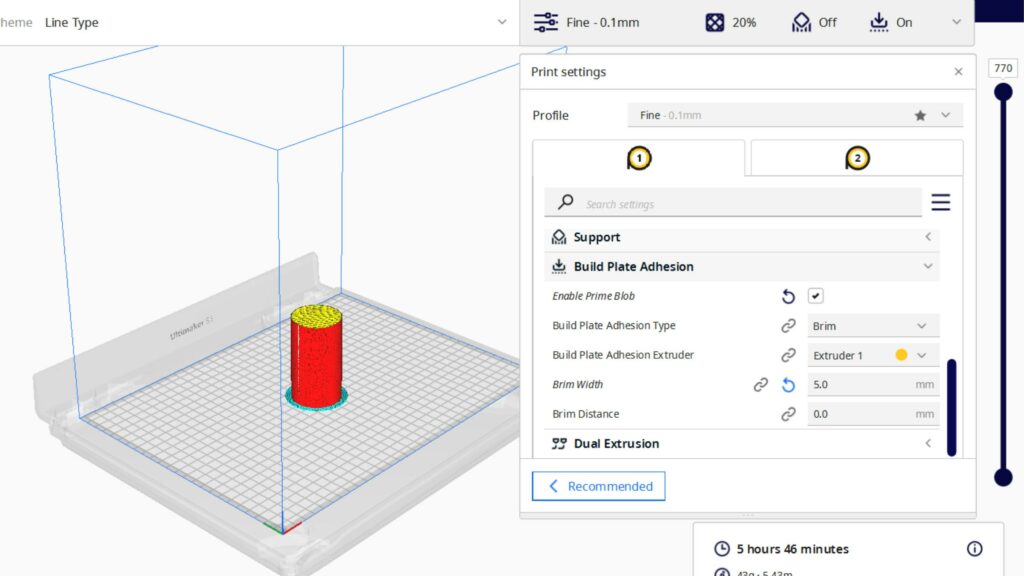
One of the options in the print settings panel is Build Plate Adhesion. You should see this option in the print settings panel during every design’s Prepare and Preview phase.
So, once you load a design and select a material, you will find two print setup options:
- Recommended
- Custom
You should choose the Custom option to access and change the Build Plate Adhesion settings. Cura should automatically supply your 3D print with a raft as soon as you enter the Custom settings.
Then, scroll down to review and modify the dimensions of the raft to reduce its size.
Here are the main raft dimensions you may consider reviewing and reducing:
- Raft base layer thickness
- Raft base layer width
- Raft base layer spacing
- Raft middle layer thickness
- Raft middle layer width
- Raft middle layer spacing
- Raft top layer thickness
- Raft top layer width
- Raft top layer spacing
Changing one or more of these layers’ dimensions through the Build Plate Adhesion settings is an effective way to reduce 3D print raft size in Cura, whether it is to save filament or match the raft dimensions with your 3D print.
Still, I don’t recommend veering too far from the recommended settings for a raft’s dimensions unless a 3D model is unique and demands an entirely distinct approach to printing.
A tiny model doesn’t usually need a thick or wide raft. In addition, if you have a 3D printer with a heated bed, you can reduce the raft size to slightly smaller than the recommended settings.
In addition, if you only want to save filament by reducing the raft size, I recommend altering the width of each layer, then minimizing the thickness of the middle layer. Changing these settings shouldn’t affect the stability of your 3D print too much, but it will make the raft both thinner and narrower.
You can optimize any of the nine dimensional features of the three raft layers in Cura, using up to the generally recommended 0.1 mm (0.003 in) increments.
Exercise caution to prevent risking the quality of the 3D print, primarily if you are concerned with one or more of the following issues:
- Adhesion
- Layer separation
- Warping
2. Reduce the 3D Print Raft’s Extra Margin
The Build Plate Adhesion settings have many options for you to configure the raft for any selected 3D design, material, and profile.
One of the first options under the Build Plate Adhesion Type is the Raft Extra Margin.
The Raft Extra Margin is essentially how much the support will extend beyond the outer wall of the 3D model. This extra margin applies to the entire perimeter of a raft.
You may find the Raft Extra Margin set at 5 mm (0.19 in), which is the default. If you want, you can consider reducing this as long as it doesn’t impair the stability and viability of your 3D print.
This method will lessen the raft size, even if you don’t change the other dimensions.
You can check the Visibility option if you don’t find the Raft Extra Margin option in the Build Plate Adhesion settings. A gear icon next to Build Plate Adhesion will let you access the Setting Visibility menu.
Once the Setting Visibility menu pops up, click the checkbox next to all the options you want to appear in the Print Settings. Scroll down on the menu and find the Raft Extra Margin setting.
Then, check the little box next to it so you can access it from the Build Plate Adhesion settings.
3. Review the Number of Top Layers
The third way you can reduce 3D print raft size in Cura is by opting for fewer top layers. This option isn’t necessarily the best method because you may only have two or three top layers to begin with in your raft settings.
Reducing a top layer doesn’t have that much of an impact on the size. Altering this number also has the chance of affecting adhesion.
For example, if you reduce the top layers, the base or first layer of your 3D print may be vulnerable to layer separation or warping. Plus, the smoothing effect may not be desirable.
Furthermore, if you have a large raft air gap to facilitate easier removal of the 3D print, opting for fewer top layers may not work out for your design or model. Besides, the initial Z-layer overlap’s compressing effect may be too much for a raft with fewer top layers.
If the objective of reducing 3D print raft size in Cura is a smaller footprint and saving on some filament, altering the dimensions and extra margin will have a more significant impact.
Summary
Consider smaller dimensions and extra margin to reduce 3D print raft size in Cura. However, it is always better to play it safe by only making minor changes. Don’t reduce the dimensions or the extra margin drastically to the extent that your raft is too small or unviable for the 3D print.
- Written by:
- Ben
- Last updated:
- 11/23/2023
About Ben
I started 3D printing since 2013 and have learned a lot since then. Because of this I want to share my knowledge of what I have learned in the past years with the community. Currently I own 2 Bambulab X1 Carbon, Prusa SL1S and a Prusa MK3S+. Hope you learn something from my blog after my years of experience in 3D printing.