Adding a brim and raft in Slic3r is a modification to the standard settings to improve adhesion during print. A brim is a wider base that can be added to models, while a raft is an extra layer attached to your model using the same bed as the model itself. So, how do you add rafts and brims in Slic3r?
Here’s how to add rafts and brims in Slic3r in 7 easy steps:
- Open Slic3r and load your model.
- Click on “Printer Settings” in the top menu bar.
- Scroll down until you see the “Skirt & Brim” section.
- Select the appropriate settings for your brim.
- Generate support material and customize raft settings.
- Click on the “Preview & Print” tab.
- Print your model.
This step-by-step guide will walk you through the steps to get slic3r up and running, load your model, add a brim and raft for adhesion purposes, and finally print your object. If this is the information you’re looking for, then keep reading.
1. Open Slic3r and Load Your Model
Before adding any rafts and brims in Slic3r, you must first open Slic3r and load your model. To do this, follow these steps:
- Open the Slic3r program on your computer
- From the top menu bar, click on “Plater.”
- Drag your model onto the window labeled “Drag your objects here.” Alternatively, click on the “Add” button on the bottom center of the Slic3r window.
Pro Tip: For more information on working with Plater, I recommend reading this detailed guide by Slic3r.
2. Click on “Printer Settings” in the Top Menu Bar
Now that you have successfully added your model, it’s time to dive into the Printer Settings. To do this, click on “Printer Settings” in the top menu bar. This will bring you to a new window with several subheadings, including the one labeled “Skirt & Brim.”
Note: Make sure you added your model to the Plater before clicking on “Printer Settings.” If you didn’t, click on the plater tab to add your model before continuing.
3. Scroll Down to the “Skirt & Brim” Section
Once you have clicked on Printer Settings, you’ll see the following sections (from top to bottom):
- Layers and perimeters: This section allows you to adjust the standard settings for layer height and number of perimeters.
- Infill: This section allows you to customize infill density and patterns settings.
- Skirt and brim: This section allows you to choose settings for skirts and brims.
- Support material: This section allows you to customize support settings, including support density and pattern.
- Speed: This section allows you to adjust the speed of different sections during printing, including infill and outlines.
- Multiple extruders: This section allows you to customize the settings for different extruders.
- Advanced: This section allows you to customize advanced settings for Slic3r, such as retract distance and skirt overlap.
- Output options: This section allows you to customize the settings for your printer, such as bed size and output format.
- Notes: This section contains notes on printer settings, including an explanation for each section.
- Shortcuts: This section contains shortcuts for standard functions in Slic3r.
In this guide, you’ll only use the “Skirt & Brim” section within Printer Settings. However, please feel free to experiment with all of the settings and customize your model to your heart’s content.
For a detailed guide on the print settings and configurations in Slic3r, I recommend reading this official guide from Slic3r.org.
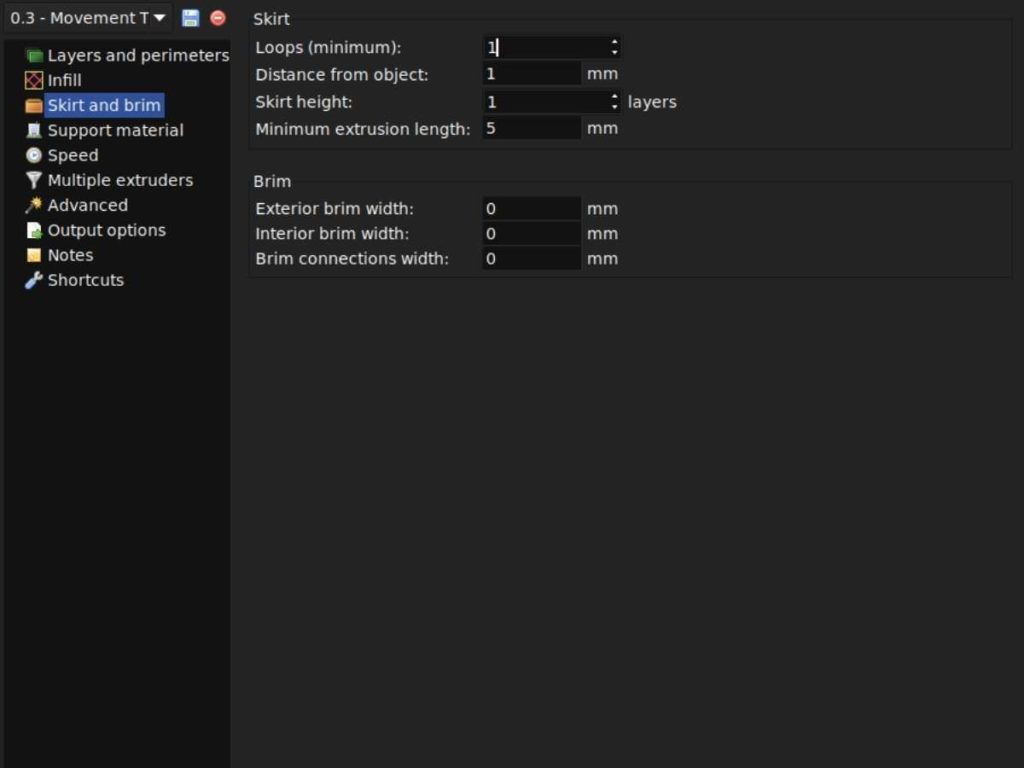
4. Select the Appropriate Settings for Your Brim
Now that you have reached the Skirt & Brim section, it’s time to add a brim to your model. To do so, adjust the following settings:
- Exterior brim width
- Interior brim width
- Brim connections width
You can set these dimensions by inputting a numerical value (in millimeters) in the designated boxes. For example, if you input 0.5mm (0.02in) for exterior width, interior width, and brim connections width, you’ll get a 0.5mm brim around the entire model.
However, if your exterior width is 3mm (0.12in) and interior width is 0.5mm (0.02in), you’ll get a 3mm brim around the exterior perimeter of your model and a 0.5mm brim inside the interior perimeter of your model.
5. Generate Support Material and Customize Raft settings
Now that you have a brim added to your model, it’s time to add the raft. To do this, follow these steps:
- Scoot over to the “Print Settings” tab
- Tick “Generate Support Material.”
- Scroll down to the “Raft layers” section.
Here’s an excellent demo on how to generate support material in Slic3r:
Once you generate support material under “Print Settings,” select the appropriate settings for your raft.
Tip: For more information on customizing raft and other settings, I recommend watching this detailed tutorial by Kinvert:
6. Click on the “Preview & Print” Tab
Now that you have adjusted your model to add a raft and a brim, it’s time to preview the model! Click on the “Preview & Print” tab. You will see your model in 3D, allowing you to make the necessary adjustments before printing it:
Tip: To rotate the model, simply click and drag your mouse across the screen. You can also adjust other features (such as size) by clicking on “Custom.”
7. Print Your Model
If you’re satisfied with your print preview, click on the “Print” button to start printing. Congratulations! You have successfully added a raft and a brim to your model.
Caveat: Now, this doesn’t mean it’ll be as easy as 1-2-3 every time. While the concept is still the same, execution may vary depending on your preferred settings. Just ensure you watch the above tutorials and read the guides I’ve recommended if you run into any issues.
In addition, I recommend reading Instant Slic3r by David Michael Moore (available on Amazon.com). The author explains how to customize slic3r, along with other helpful tips and tricks.
Wrap Up
I hope you’ve enjoyed this guide! I know it’s lengthy, but don’t be discouraged! Practice is the key to mastering Slic3r. The most crucial part is that you now have access to a helpful community of 3D printing experts who are always willing to lend a helping hand. Be sure to check out Slic3r.org to join in the conversation.
Happy printing!
- Written by:
- Ben
- Last updated:
- 11/11/2023
About Ben
I started 3D printing since 2013 and have learned a lot since then. Because of this I want to share my knowledge of what I have learned in the past years with the community. Currently I own 2 Bambulab X1 Carbon, Prusa SL1S and a Prusa MK3S+. Hope you learn something from my blog after my years of experience in 3D printing.