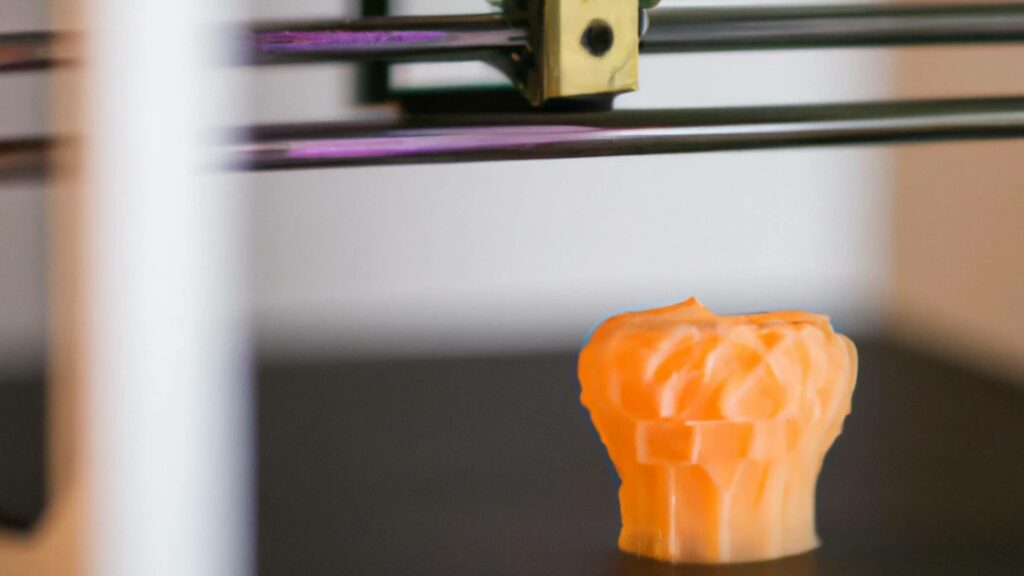
3D Printing presents endless opportunities to create art and practical items, but with all that can go right, there’s a lot that can go wrong. One of these things is a spongy and unstable print. But why does this happen at all?
Your 3D prints may be spongy due to under-extrusion or over-extrusion. Low infill percentages and incorrect first-layer settings may also cause spongy objects because the print’s outer foundation isn’t sturdy enough to keep its shape.
This article will discuss the four leading causes of spongy prints and how to fix the underlying issues. By the end, you’ll be able to reconfigure your settings and solidify your 3D-printed objects once and for all.
1. Under-Extrusion
Under-extrusion occurs when a printer doesn’t extrude the filament necessary to create a particular print.
Some factors that cause a 3D printer to under-extrude filament include:
- A clog caused by low temperatures.
- A clog caused by residue build-up in the nozzle.
- Incorrect calibration and print settings.
- Problems with the filament.
In addition, a clogged, dirty nozzle will extrude far less filament than is needed for a stable and complete print. If you do not clean your printer after a clog, you could cause permanent damage to your 3D printer.
How To Fix
To prevent under-extrusion, you must first set your printer to the proper temperature for your filament. Some examples of good temps for the most popular filaments are:
- PLA: 356°F (180°C).
- ABS: 464°F (240°C).
- Nylon: 464°F (242°C).
Though these aren’t necessarily set in stone, it’s vital to set your printer to a temperature high enough to melt the filament and successfully extrude it.
You may also want to lower the speed of your printer’s build surface cooling fans to prevent external temperatures from interfering with the extruder’s temp.
To avoid residue build-up, regularly clean the nozzle with a wire brush, acetone, or warm, soapy water. A quick scrub gives the nozzle a good cleanse without damaging it.
Finally, issues with the integrity of the filament can harm the print. For instance, a damp filament can indirectly cause under-extrusion. Storing filament in an airtight container, or drying it in the oven if it does become moist, will help you prevent this.
2. Over-Extrusion
Over-extrusion is the exact inverse of under-extrusion. It occurs when the nozzle extrudes more filament than needed, which can also cause blockages inside the nozzle, resulting in lumpy, stringy prints and poor details.
If over-extrusion doesn’t cause a jam, it can result in the following:
- Severe warping
- Stringing and blobs
- Wide layers that don’t have much definition or detail
- Sponginess
- Elephant’s foot
How To Fix
To fix issues related to over-extrusion:
- Reduce your nozzle height so it’s less than the diameter of the nozzle. Layer height controls how much filament is needed per layer, and reducing this will fix the overflow of filament from the nozzle.
- Switch on the printer’s cooling system. Printers have built-in fans that cool the print as the nozzle extrudes filament. Turning these fans on can cool the filament and slow its flow rate, making it steady and less likely to clog.
- Check your print temperature. The material may over-extrude if your printer’s temperature is too hot for a filament. Check your filament’s recommended print temps when adjusting this setting.
You might also want to clean your fans with compressed air to ensure your cooling system works correctly.
3. Your Infill Percentage Is Too Low
Infill percentages determine how dense the print will be. A low infill percentage is a one-way ticket to a fragile 3D-printed object.
The relationship between the outer layers and infill is also essential in maintaining a solid print, and if these don’t overlap enough, they will fall apart.
The interior of your object is particularly vulnerable if the print is hollow on the inside, as there’s nothing to reinforce the outer layers of the print. Thus, there is a higher chance of gaps forming between layers without sufficient infill.
How To Fix
The solution is simple: increase the infill percentage. An increase of 10 to 15% will enhance the print’s strength. However, as with all 3D printing, experimentation is vital; find what works best for you and stick with it.
You should also increase your infill overlap percentage as you adjust the infill percentage. Connecting your infill to your print reinforces the outer walls and ensures the object can withstand force without crumbling.
Something to consider when it comes to infills is infill patterns. Specific patterns are inherently denser than others. Triangular fill, for instance, is the most robust infill pattern. Other infill patterns include:
- Rectilinear
- Honeycomb
- Concentric
- Grid
- Cubic
- Gyroid
Read more about the various infill patterns and their unique qualities here.
4. Incorrect Layer Height Settings
Your layer settings determine how thick and dense your print’s outside “walls” will be. If the top or bottom layer settings aren’t suited to what the print needs to maintain its shape, it’ll end up sagging in the middle and be more soft and spongy than solid.
Keep in mind that layer height will determine not only the structural value of a print but also the aesthetic value.
- Lower layer height works better for more intricate detailed prints. It creates a smoother transition between layers, avoiding the noticeable steps that a higher layer height may have.
- Higher layer height is a faster, more material-efficient way of printing, but you risk creating noticeable steps in the print, making it less aesthetically pleasing.
How To Fix
Regardless of what 3D printing software you’re using, your printer or your slicer will allow you to modify the top and bottom layers’ thickness.
The thicker the layer, the sturdier the print. However, if the layer height is too tall, you could create issues such as over-extrusion, warping, or blobbing.
Generally, the best layer height will be the diameter of your nozzle divided by two. You can go up or down from that measurement by a millimeter or two, but it’s best to stay close to the nozzle diameter’s measurement.
For example, if you use a standard 0.4mm nozzle, the best layer height is between 0.2mm and 0.3mm.
As well as adjusting the thickness of the layers, you can determine how many layers there should be. Setting this to two to four layers on the bottom and six on the top is generally sufficient for preventing a spongy 3D print.
Remember that although a thicker layer is more substantial, it isn’t necessarily better. Thicker layers stand out more, breaking the seamless illusion that 3D prints typically have. Overly thick layers also separate more quickly than thinner layers would.
Conclusion
3D printing enthusiasts, new and experienced, dread a spongy print. The causes behind a spongy 3D print are generally a result of extrusion issues or structural problems.
So, if your 3D prints come out soft and spongy, check your print temperature, layer height, and infill percentage.
- Written by:
- Ben
- Last updated:
- 11/11/2023
About Ben
I started 3D printing since 2013 and have learned a lot since then. Because of this I want to share my knowledge of what I have learned in the past years with the community. Currently I own 2 Bambulab X1 Carbon, Prusa SL1S and a Prusa MK3S+. Hope you learn something from my blog after my years of experience in 3D printing.