If your print failed or paused mid-job, there are still some ways to save it from the garbage. So, say you ran out of filament, the power went out, or there was a jam in your extruder. In that case, you’ll need to know how to resume the print job at a specific layer.
Here’s how to resume a 3D print at a specific layer in Cura:
- Count the printed layers on your 3D printed object.
- Open the Gcode for your 3D model.
- Locate the last layer you printed in the Gcode.
- Delete the layers you have already printed from the Gcode.
- Adjust your Z-axis height in Gcode.
- Clean up your partial print and resume your print job.
So, let’s go through these steps together and save your half-finished 3D print. I’ll teach you how to measure the layers, edit the G-code with Cura, and align your nozzle so that you can finish any 3D printed object starting from whatever layer you want. So, let’s jump right in!
1. Count the Printed Layers on Your 3D Printed Object
Before you can resume printing in Cura, you’ll need to know the last layer you printed. The simplest way is to count the layers on the portion you have already completed.
There are a couple of simple ways to figure out what layer your printer left off at. So, let’s look at these layer-counting methods:
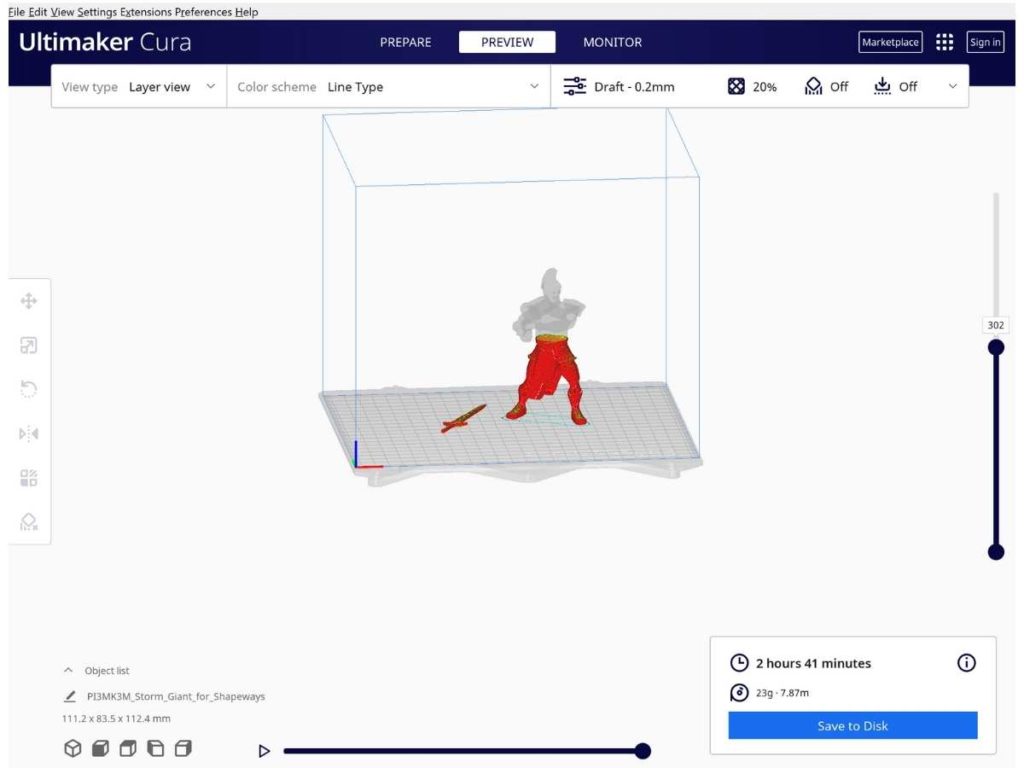
Use “Layer View” in Cura To Identify the Last Layer
Cura has some fantastic features that make recovering from 3D printing failures simple. One feature that will come in handy if you want to resume your 3D print is “Layer View.”
You can use “Layer View” in Cura to identify the spot where your printer stopped. Layer view will show you the printing strategy for your model, and it can even show you a layer-by-layer simulation of the entire print job.
So, to use this method, open up “Layer View” and analyze the half-printed part on your print bed. Then, move through the print process simulation until you find the spot that matches your 3D printed part. Now, you know what layer you’re on!
For a quick walkthrough of this handy feature, check out this video from Ultimaker:
Count the Number of Layers by Hand or Measurement
Use a pointer to help maintain accuracy and count the total number of layers completed. You can use a marker, pin, or other pointing aid to help you calculate the total number of layers accurately.
You can also use a ruler or measuring tape to measure the distance from the printing bed to the height where the printing stopped. Then, divide that measurement by your layer height. Once you do the math, you know the exact spot where your print stopped.
2. Open the Gcode for Your 3D Model
Once you know which layer you’ve left off at, you’ll need to find a way to subtract the portion you already printed from your 3D model. Believe it or not, the easiest way to do this is usually to open up the print’s Gcode.
To start this process, save your model as a “Gcode file.” You can usually do so by clicking on “Save As” and then using the drop-down menu on the pop-up window to locate the file type.
Now that you have saved the Gcode file, you’ll need to use a text editor to change things.
As beginner-friendly software, Cura doesn’t allow you to change the Gcode in the program, so I recommend using something like Notepad++ (available for free) or another text editor to edit your Gcode with Cura.
Once you have your text editor booted up, open your Gcode file with it.
3. Locate the Last Layer You Printed In the Gcode
Now, it’s time to find the spot where your 3D printer stopped printing. You can use a search function (command+F for MAC, ctrl+F for PC) to search for the layer.
When you open the search function, enter “Layer:X,” with X standing for the layer number you located in step one of this guide.
When you find the layer, look at the line of code. It should have letters like X, Y, and Z (which indicate where your nozzle will be on the X, Y, and Z axes). Take note of the number that follows the “Z,” which should look something like this:
- Z33.4
Next, you’ll want to send your printer nozzle to the home position. You can do this by entering the line “G28.” Your printer nozzle should move to the starting position when it reads that code.
4. Delete the Layers You Have Already Printed From the Gcode
Once you’ve found your layer, it’s time to delete almost everything that came before it.
You’ll need to leave the startup commands in your Gcode. When working with Cura, this is typically 17 lines of information that will give your printer the most basic instructions before it starts to print.
So, to move up the new starting layer, highlight every G line from the layer where your printer stopped up to the beginning of the code (leaving those 17 lines of critical information), then delete your selection.
5. Adjust Your Z-Axis Height in Gcode
Next, we need to set the nozzle not to hit the portion of your print that you already created.
To do so, locate the “G0” command, which should be near the top of the Gcode file. In most of my files, I can find it around line 20. It should have an X and Y-axis value following it. Press enter to add another line to this code.
Then, on the line before the G0, enter “G1 Zx,” where x stands for the z-axis height we recorded in step 3. It should now look something like this:
- Line 20: G1 Z33.4
- Line 21: G0 X15.6 Y17.8
Now, the hard part is over! Save your file and send it over to your 3D printer.
6. Clean Up Your Partial Print and Resume Your Print Job
Now that you’ve made all the technical adjustments, it’s time to get ready to finish your print!
First, you’ll need to process the spot where your printer stopped working. That’s because if you have half a layer there and resume your print on the same layer, you’ll have an uneven spot that may cause your model to fail again. So, sand down the uppermost layer of your print to smooth things out.
Then, resume your print job. Watch the nozzle and stop the print if the Z height seems too low or high. If the nozzle looks like it will hit your object and topple it, go back to your Gcode and raise the z-height. The nozzle should be around 0.1 mm above the partially-complete print.
For a fantastic and detailed walkthrough of the entire process, check out this tutorial from Ripcord:
Final Thoughts
These methods can help you resume printing at a specific layer in Cura. Although resuming your print requires some coding know-how, learning how to do it will help you develop more advanced 3D printing skills and allow you to save your 3D printed objects from the garbage.
- Written by:
- Ben
- Last updated:
- 11/19/2023
About Ben
I started 3D printing since 2013 and have learned a lot since then. Because of this I want to share my knowledge of what I have learned in the past years with the community. Currently I own 2 Bambulab X1 Carbon, Prusa SL1S and a Prusa MK3S+. Hope you learn something from my blog after my years of experience in 3D printing.