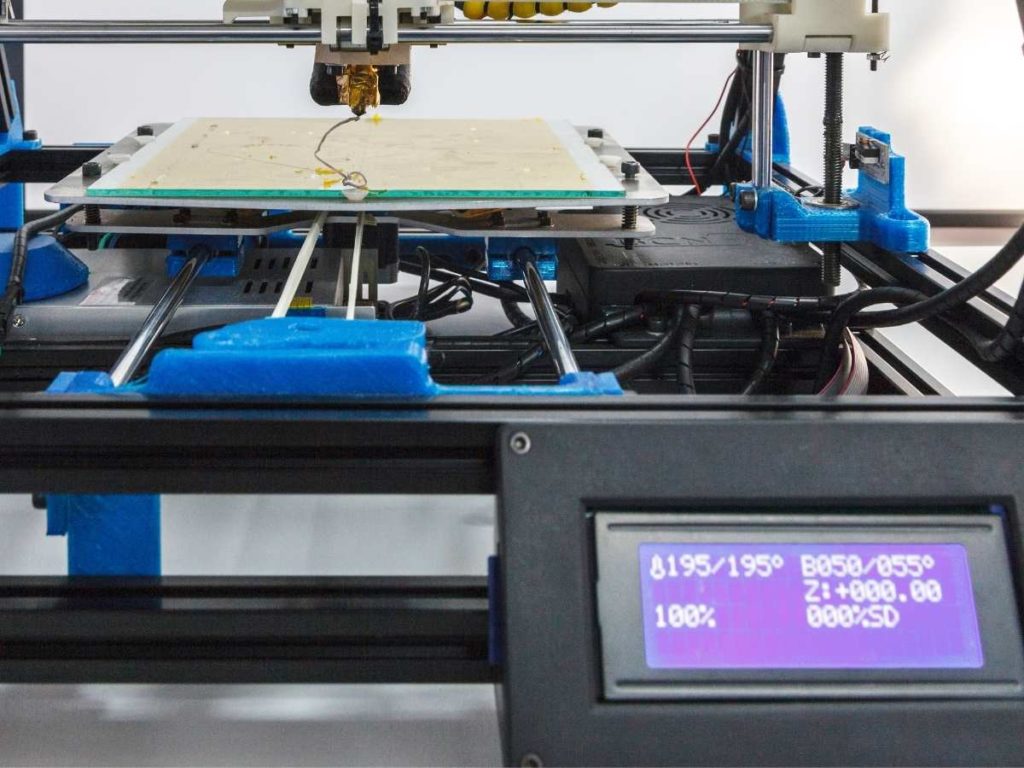
One of the most common problems among users of 3D printers is the filament clogging in the nozzle, which will bring lots of trouble when trying to print, including seeing the filament curl around the nozzle. However, this shouldn’t stop you from creating your object, and there are a few ways to help prevent it from happening in the future.
Here’s how to fix 3D printer filament curling around the nozzle:
- Use the right printer filament for your 3D printer.
- Ensure the extruder’s temperature isn’t too hot or cold.
- Clean off any excess filament from the nozzle.
- Ensure the nozzle isn’t too close to the bed.
- Add adhesion to the surface of the bed.
- Ensure the flow rate is consistent.
- Use a filament clip.
- Use a good quality nozzle.
- Replace the Teflon tube.
- Ensure the hot end is in good condition.
- Clean the extruder gear.
- Dry the filament using silicon tape.
- Raise the bed temperature.
- Don’t use cooling for the first layer.
- Lubricate the filament.
- Loosen the extruder.
- Increase the speed of printing.
- Increase the layer height.
In many cases, a clogged nozzle is the culprit behind curling filament, but it could also be down to the temperature of the print bed or a lack of adhesion. So, the rest of this article will cover all the ways to fix 3D printer filament issues, including cleaning the nozzles and ensuring the hot end is at the right temperature.
1. Use the Right Printer Filament for Your 3D Printer
Ensure you use the right filament that is compatible with your printer.
Notably, it would help to know the diameter and type of filament that your machine can print before purchasing a new roll. In addition, it’s wise to find out if your printer supports different colors.
If you use the wrong printer filament, it’ll significantly influence the extrusion and may lead to more trouble, such as a clogged nozzle.
2. Ensure the Extruder’s Temperature Isn’t Too Hot or Cold
The extruder of your 3D printer is responsible for heating the plastic filament in the container so that it can be pushed into the nozzle to print.
So, ensure that the extruder doesn’t get too hot or cold, or the filament won’t extrude properly.
For example:
- If you’re using PLA filament, you should set the temperature of your extruder at 185°C-195°C (365°F-401°F).
- If you’re using ABS filament, it needs to be kept at 210°C-250°C (410°F-482°F).
If you overshoot your temperature, the filament might clog and break off inside the nozzle. It can cause a lot of trouble for you to unclog it and fix the problem.
The temperature guide given above will help to keep things at an appropriate heat, ensuring that the filament won’t clog up inside the nozzle but still have enough plasticity to be pushed out by the extruder gear.
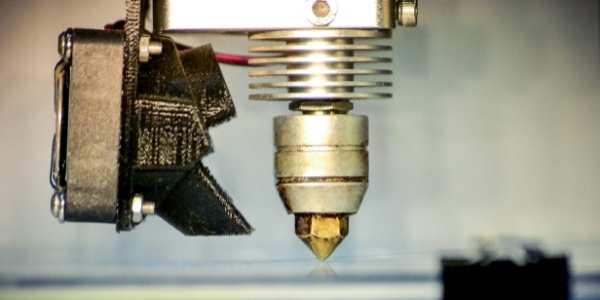
3. Clean Off Any Excess Filament From the Nozzle
When printing, always ensure there’s no excess filament on the nozzle. You can check this by observing it closely while printing the first few layers of your object.
If your extruder has excess filament on the nozzle, it may cause the flow to be blocked completely. In some cases, you might even end up having a tangled mess of filament inside your extruder gears.
Other issues include the filament curling up and around the nozzle. This happens when newly extruded filament comes in contact with the excess and adheres to it rather than the print bed.
Therefore, if there’s any excess filament on the nozzle, stop your 3D printer immediately and clean it by simply tapping on the hot end.
Here’s a video that explains how to clean your 3D printer’s nozzle:
4. Ensure the Nozzle Isn’t Too Close to the Bed
You shouldn’t place your 3D printer nozzle too close to the bed when heating the nozzle.
If the nozzle is too close to the bed, it may force the filament to bend while going into it. This pushes more filament into a smaller area and also more tightly.
In some cases, this might lead to clogging your extruder gears with excess plastic filling up inside, which you’ll have a hard time removing from the extruder.
5. Add Adhesion to the Surface of the Bed
As mentioned, the filament may curl up and around the nozzle when it cannot properly adhere to the print bed.
When printing, add some adhesion to the bed’s surface to avoid this. For example, you can use Blue Painters’ Tape or Kapton tape on your printer’s heating bed.
If you have ABS filament, then it’s wise to use a heated flatbed so that the plastic will be more likely to stick to the surface.
Another great option are these Gizmo Dorks Kapton Tape Sheets from Amazon.com. They’re ideal for use with ABS, are resistant to high temperatures, and can be reused multiple times.
6. Ensure the Flow Rate Is Consistent
If the flow rate of your printer is too light, you might see the filament curling around the nozzle. This is due to the lack of pressure forcing it out and onto the print bed.
To ensure that the flow rate of the 3D printer filament is consistent, you need to calibrate your extruder and make sure it doesn’t suffer from clogging.
If your 3D printer’s calibration is not accurate enough for you, use a software-based approach such as Slic3r.
This software would let you adjust the flow rate of your filament. Doing this ensures that your 3D printer extruder will work at an accurate speed when feeding filament into the nozzle.
7. Use a Filament Clip
If you have a lot of failed prints, it would be best for you to purchase a filament clip. The object of this device is to aid in the unspooling and placement of your 3D printer filament.
You may see poor extrusion if the filament is caught at the source or tangled.
Clipping onto your spool keeps the filament from unwinding too fast or too slow. It also prevents any backlash that may cause tangles or jams on your extruder gears or nozzle.
This device is recommended for newbies and 3D printing enthusiasts who want to prevent any unexpected jams and snags.
8. Use a Good Quality Nozzle
When printing with a 3D printer, you should ensure that the nozzle is of good quality. If your nozzle is worn-out or doesn’t properly fit, it would likely cause clogging in the hot end.
It may also cause serious problems such as leakages and a weak filament flow rate, which leads to curling filament.
If you’re looking for quality nozzles, I recommend trying out these Kingroon 3D Printer Nozzles from Amazon.com. They’re durable, feature robust and flexible cleaning needles, and are suitable for heavy-duty applications, making them an excellent option for the money.
9. Replace the Teflon Tube
If your 3D printer has a Teflon tube, you should consider replacing it as soon as possible.
The Teflon tube inside the hot end is responsible for feeding the filament from spool to nozzle. It also provides pressure resistance while extruding plastic from the nozzle.
To maintain a smooth filament flow, ensure that you replace your Teflon tube if it’s already worn out or damaged internally.
10. Ensure the Hot End Is in Good Condition
Like the Teflon tube, the hot end of your 3D printer is also another part that you should consider if you’re having problems with the filament.
If you don’t have an adequate hot end, it’ll cause jams in feeding filament into the nozzle. It may even lead to under extrusion – where the nozzle extrudes insufficient plastic.
Under extrusion often leads to filament curling around the nozzle.
For these reasons, ensure that your hot-end is compatible with use on specific filaments (if applicable). Also, make sure it has no blockages or leaks, which might affect your printing process’s quality and consistency.
11. Clean the Extruder Gear
Dirty extruder gear is another primary reason you have issues with the filament. Generally, they can get clogged up with plastic after extended periods of use.
Check if your spinning gear is in good condition or not by looking through the glass window for any visible defects or foreign objects stuck on the teeth rims.
You may need to take apart your 3D printer and clean out any excess plastic inside its gearbox before printing.
12. Dry the Filament Using Silicon Tape
After cleaning up all excess plastic sticking onto the nozzle, the next step you should take is applying some silicon tape onto the circumference of the hot end.
This process will help to increase the adhesion between the filament and nozzle. It also enhances heat transfer efficiency during extrusion.
You can purchase silicone tape at any DIY, hardware, or home improvement retailer.
13. Raise the Bed Temperature
To prevent your 3D printer from having issues with the filament, check the temperature of your bed or platform before each new project.
When it comes to printing objects with a larger volume, there’s a possibility that the plastic will cool off before being wholly laid down onto the print surface. If this happens, you might see it start to curl up as it contracts.
You need to raise your bed temperature by 10 degrees or more until satisfactory results are achieved to fix this problem.
14. Don’t Use Cooling for the First Layer
One trick commonly used by 3D printing enthusiasts when they encounter problems during their first layer is cooling everything down using a fan. However, this may not always be a good idea as cooling can also cause a mess of extrusion.
In the case of standard PLA filament, it’s advised that you don’t cool too much, or else there’s a higher chance that your first layer won’t stick to the build surface.
But for other filaments such as ABS and PETG, it would be okay to go ahead with regular fan speed and control flow rate accordingly.

15. Lubricate the Filament
If you noticed that your 3D printer has problems with the filament feed from the spool to nozzle, then lubrication may be a quick fix.
The lube or grease aims to reduce friction between components such as bearings, joints, rails, and other moving parts.
In short, applying some lubricant would help improve the smoothness in feeding the filament from the spool right down towards the hot-end nozzle for better printing results.
16. Loosen the Extruder
Another way to fix a 3D printer filament issue is by loosening your extruder or feeder.
It might sound counter-intuitive, but you should only do this when you have cleaned the nozzle of any excess plastic stuck on it from previous print jobs.
Additionally, if your printer bed tends to lift up during the print, you need to adjust its height so that there won’t be any problem feeding filament into the hot end nozzle.
You can also try pushing forward a small amount of filament before restarting the printing process. This will help dislodge any potential blockages in your hot end and clear out clogged nozzles for better printing results.
17. Increase the Speed of Printing
If your printer is having trouble keeping up with the extrusion speed, you need to increase its feed rate.
However, this process could be tricky if there are already problems regarding the build-up of filament on the hot-end nozzle. So if possible, try cleaning it first before applying any changes.
Make sure to do a test print and examine how fast or slow you can print out an object without causing any additional defects during printout.
This will help determine whether changing the printing speed and using a faster feeder would resolve your issues with 3D printer filament jammed.
Keep in mind that if you push the filament too fast, you might see it curl around the nozzle. Similarly, if you go too slow, it may cool down and begin to contract.
18. Increase the Layer Height
Generally, this process will only be applicable if your printer can increase its layer height. But it may work for certain prints.
For example, if you’re trying to print out an object with small details while having problems with the 3D printing filament curling around the nozzle, adjusting the layer height would make it easier for the filament to move through the extruder nozzle.
Frequently Asked Questions
Why Does My Filament Curl Up?
In general, 3D filament curls up due to extreme extruder temperature, excess filament on the nozzle, and lack of adhesion to the bed. Also, a worn-out Teflon tube or dirty extruder gear may cause the filament to curl.
To address these causes, you need to slow down your printer head speed, clean out excess plastic on the nozzle, or use a heated bed.
In addition, you should replace damaged Teflon tubes and clean your extruder gear.
How Do You Flatten a Warped Print?
To flatten a warped print, roll it in the opposite direction of the curl. To straighten the print, do this on a flat surface, such as a table. For prints with deep warps, you can try using weights or clamps to hold it flat while it dries.
Additionally, you can use another object with a flat surface, such as glass or acrylic. Press the warped print against the flat surface to flatten it. If the print is still too warped, you can try using a heat gun to gently apply heat until it becomes flat.
Conclusion
If you’re having issues with your 3D printer filament curling around the nozzle, it could be anything from the temperature of the print bed to the type of filament being used. It could also be an issue with the temperature of the extrusion.
Also, it would help if you considered the overall condition of your 3D printer.
For starters, it’s crucial to clean any excess filament from the nozzle before further adjustments. This will help prevent clogs and blockages from forming even before it could cause other problems such as 3D printer filament jamming, print defects, or even worse, a ruined print.
- Written by:
- Ben
- Last updated:
- 11/17/2023
About Ben
I started 3D printing since 2013 and have learned a lot since then. Because of this I want to share my knowledge of what I have learned in the past years with the community. Currently I own 2 Bambulab X1 Carbon, Prusa SL1S and a Prusa MK3S+. Hope you learn something from my blog after my years of experience in 3D printing.