The printer nozzle may not get as much attention as other parts of a 3D printer. However, it has a significant impact on print quality and production time, so you need to pay more attention to it. How tight should it be?
A 3D printer nozzle should be tight enough to stay in place while working without putting too much pressure on the filament. The best approach for finding the perfect tightness for your printer nozzle is through a series of experimental prints or using a special torque wrench.
A poorly fitted 3D printer nozzle can keep you from achieving your desired results. In this article, you’ll learn how to find the perfect tightness level for your 3D printer nozzle. We’ll also cover some important printer-nozzle-related tips to help you get the perfect result.
What’s the Perfect Tightness for a 3D Printer Nozzle?

The perfect tightness level for a 3D printer nozzle is somewhere in the middle. It should be tight enough to work without slipping. However, it shouldn’t be too tight to the point of exerting excess pressure on the filament.
A loose 3D printer nozzle may not allow extrusion of filament. It may also allow partial extrusion. In both cases, your printing won’t be completed, and it will likely lead to wasted filament. If it’s too tight, it may lead to filament grinding.
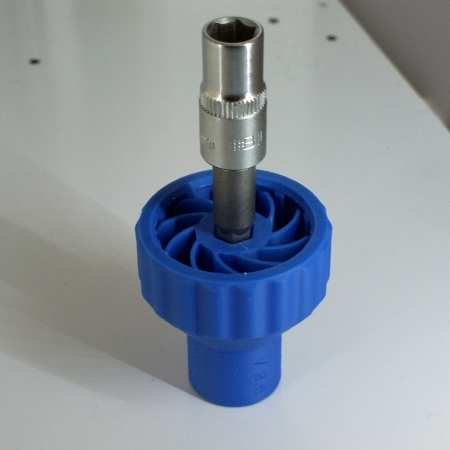
You can get the perfect balance by printing the Nozzle torque wrench by Anders Olson. It will click and prevent further tightening once you’ve tightened the nozzle enough.
How to Correct 3D Printer Nozzle Tightness
You can correct your 3D printer nozzle tightness by running a few test prints. If the nozzle is loose, you can use a wrench to tighten it a bit. If it’s too tight, adjusting the gear grip on the filament can remedy the situation. Most extruders have a screw you can easily adjust with a flathead screwdriver.
Alternatively, you can loosen the nozzle directly. However, you need to apply caution to prevent damage to the threads around the nozzle seating.
How to Change Your 3D Printer Nozzle
Sometimes, the tightness of your 3D printer nozzle is not the cause of your damaged or incomplete print work. It could be that the stock brass nozzle has run its course. Swapping it out for a hardened steel or stainless steel option may deliver the results you’re aiming to achieve. Here’s how to complete the change:
Gather Your Tools
In many cases, all you need to change your 3D printer nozzle include a wrench to hold the nozzle and a crescent wrench (a set of channel locks will also suffice) to hold the heater block. The tools you need might change a bit depending on your 3D printer, but these two are often enough for any nozzles that feature the popular M6 threading.
Heat the Printer’s Hot End
Heating your printer’s hot end will expand the metal around the heat break, nozzle, and heater block. Once expanded, the threads will be more pliable and easier to loosen. Trying to loosen the nozzle when these bits are cold increases the risk of damaging your nozzle or heater block threads. They typically shrink too tight when cold. Don’t forget to remove filaments in the printer.
Remove the Old Nozzle
Once your hot end is heated, use channel locks to hold down the heater block. You don’t need to apply too much pressure, just enough to keep the block from rotating during the nozzle removal process. Use the small wrench to grip the nozzle with your other hand, and unscrew it (clockwise). You only need a few twists to break the tension, and it should be smooth sailing from there.
Install the Fresh Nozzle
The fresh nozzle you’re looking to install will be a bit harder to screw in because the threads are yet to expand. However, the process is also straightforward. Start by screwing it in with your hand, and then complete the process using a tool. You should be careful at this point to avoid tearing out the nozzle threads due to excess torque. Again, you can use the Anders Olsson nozzle torque wrench to get the perfect torque.
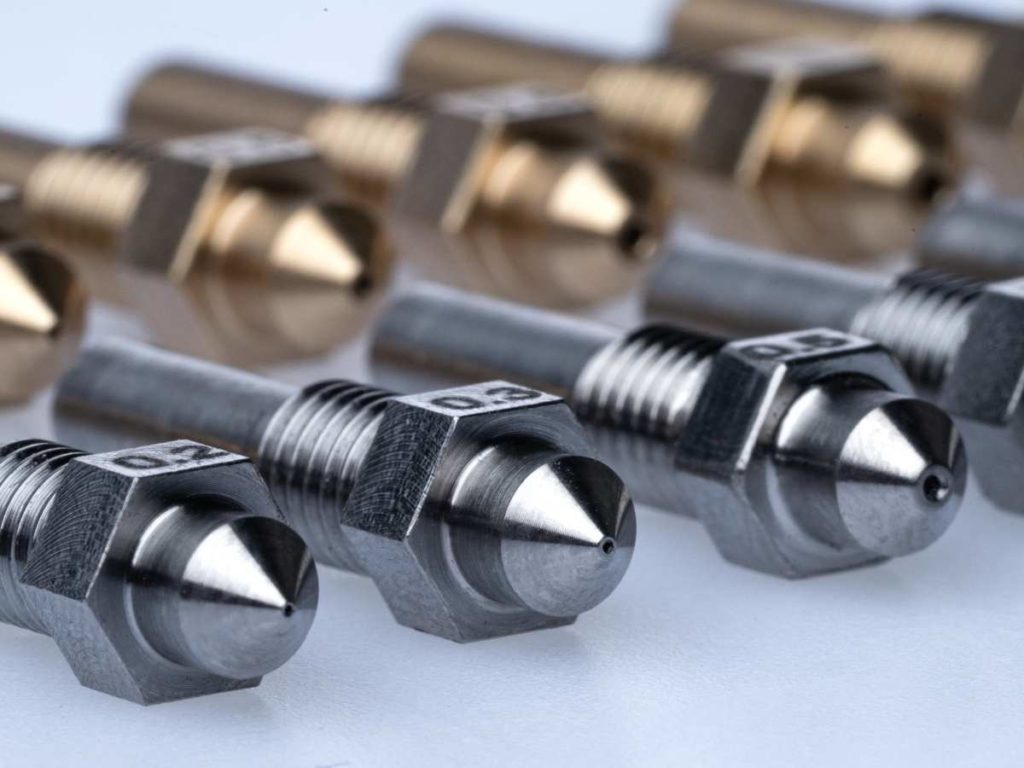
What’s the Best 3D Printer Nozzle Size to Use?
There’s no universal answer for the best 3D printer nozzle size to use. Your focus should be on choosing the nozzle that best fits the print you’re looking to achieve.
Most 3D printers allow you to swap nozzles easily. The nozzles also come in packs of different sizes, so switching to the perfect option for the project isn’t too costly.
The 0.4mm nozzles are the most common option because it’s a perfect middle-ground size that works well for most 3D printing projects. You’re sure to capture great detail, and you won’t have to wait for ages to get a completed print. If there’s a universal printer nozzle size to go with, it’s likely this one.
However, you may get better results overall on certain projects by stepping down to nozzle sizes of 0.25mm, 0.2mm, 0.15mm, and 0.1mm. With many fused deposition modeling (FDM) machines, these smaller sizes will also produce quality results.
How to Measure Printer Nozzle Size
You can find the diameter of the printer nozzle on the sides of the new units. However, once the nozzle is already in the extruder, the measurement can be hard to reach. The measurement is even harder to calculate if you’ve been printing for a while.
The nozzle size might have changed over time if you’ve been working on abrasive material. The best way to measure your printer nozzle size is to extrude some material into the air at a very slow pace. Once the extruded filament cools, measure it using a micrometer for a more accurate result.
Final Thoughts
3D printer nozzles are one of the most important moving parts in the printing process. You have to take care to ensure your nozzle is just tight enough to get the job done. Solutions like the Anderson Olson nozzle torque wrench simplify the process. After using it for a while, you’d get a feel of the right level of tightness to aim for.
Don’t hesitate to change the nozzle if you suspect that the problems you’re dealing with go beyond tightness.
- Written by:
- Ben
- Last updated:
- 11/22/2023
About Ben
I started 3D printing since 2013 and have learned a lot since then. Because of this I want to share my knowledge of what I have learned in the past years with the community. Currently I own 2 Bambulab X1 Carbon, Prusa SL1S and a Prusa MK3S+. Hope you learn something from my blog after my years of experience in 3D printing.