The foundation of any 3D printed creation is its first layer. If the first layer goes wrong, your print likely won’t make it to completion. Getting the first 3d print layer right is a matter of proper preparation and calibration of your 3D printer.
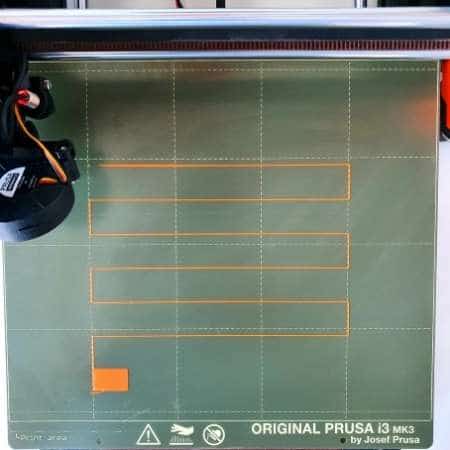
A perfect 3D printed first layer should be flat without vertical ripples, be firmly attached to the build surface, and have no gaps within the outline of the object you’re printing. It should closely resemble the predicted first layer shown in your slicing software.
The presence of ripples or gaps will indicate that the printer or its software is either not set up properly or improperly calibrated. A lack of proper adhesion to the build surface means the build surface wasn’t prepared properly. Read on for how to learn how to get the perfect 3D printed first layer and more.
How Do You Get a Perfect 3D Printed First Layer?
To get a perfect first layer in your 3D print, there are several steps that you have to do to ensure the printer and its software are correctly set up, the build surface is clean and adequately prepared, and the correct settings are entered in the printer.
- Set Up the 3D Printer Properly
There are several prerequisites in the physical setting of your printer to getting a perfect first layer.
- The printer should be placed level and sturdy table and workbench.
- The printer should be set in a room with as little dust as possible.
- The printer must be assembled and programmed in the manner expected by its manufacturer.
More detailed setup instructions should be available from your printer’s manufacturer. More general instructions are also available on All3DP, an online magazine.

- Calibrate the Printer
Like everything run by computers, a 3D printer must be properly calibrated to work correctly. More detailed and exact calibration procedures should be available from your printer’s manufacturer, but in general, there are three essential areas of calibration:
- The extruder
- The motors
- The build plate
Calibrating the Extruder
An improperly calibrated extruder is likely to extrude the wrong amount of filament.
To calibrate your printer’s extruder, you’ll need:
- 20 centimeters (8 in) of filament
- A ruler
- Measuring tape
- Digital calipers
- A permanent marker
Here are the steps to calibrate your printer’s extruder:
- Make three marks on the filament separated by 100 mm (10 cm).
- Insert the filament into your printer’s extruder.
- In your printer’s software, instruct the printer to extrude 100 mm (10 cm) of filament. If the extruder is calibrated correctly, the middle mark should line up with the top of the extruder. If it isn’t properly calibrated, the mark will be some distance above or below the top of the extruder.
- To properly calibrate the extruder, you must adjust the extruder/flow percentage in the software.
- Set the extruder temperature. The proper temperature depends on the filament’s material. This should be supplied by the filament’s manufacturer, but a comprehensive table of filament material properties is maintained by Simplify 3D.
Calibrating the Motors
Your 3D printer has three stepper motors, one for each axis (X, Y, Z). These motors must be properly calibrated through your 3D printer’s software. The process requires a bit of math.
- Start by placing four pieces of painter’s tape on the build surface in the form of a box, with the parallel sides separated by 100 mm (10 cm).
- Position the extruder nozzle over one side.
- Instruct the motor to move 100 mm (10 cm) in either the X or Y direction. If the motors are correctly calibrated, the extruder nozzle will end up over the opposing side. But you’re not likely to get it right on the first attempt. The differences may be minor, but even slight differences can mess up your print job.
- Adjust your printer’s M92 values. M92 values tell your printer how many steps to take per set distance. Adjusting them is a bit complicated, and a detailed procedure can be found here.
Calibrating the Build Surface
To ensure proper adhesion, you have to have the temperature of the build surface set correctly. Whether or not the build surface has to be heated depends on the material of the filament.
Depending on the material, the required build surface temperature will be between 45℃ (113℉) and 110℃ (230℉). Such temperatures can burn skin, so be very careful and wear heat-resistant gloves.
- Set the Gap
The most important part of preparing for a 3D print is setting the initial gap between the extruder nozzle and the build surface.
If the extruder nozzle starts too low, the filament will be squished and possibly scraped off the build surface as the nozzle moves relative to it. If the nozzle starts too high above the build surface, the filament will have a round cross-section or might not adhere properly to the build surface.
The nozzle should be just high enough above the build surface so that light from behind it can move through the gap.
One trick to getting the gap right is the “card test.” Take a notecard, and slide it through the gap between the extruder nozzle and the build surface. If the gap is correct, the card should only be able to slide through the gap without warping. Perform the card test at several locations around the build surface to ensure you have the gap set correctly.
- Clean the Build Surface
Filament won’t properly adhere to the build surface if the surface is dirty. Here are some tips for cleaning the build surface:
- Use a paint scraper to remove any filament or other residue from previous print jobs.
- Use the adhesive side of a piece of painter’s tape to pick up any dust.
- Wet a paper towel or clean high-thread-count cloth with high concentration (90% or higher) isopropyl alcohol and wipe down the build surface.
- Level the Build Surface
If the build surface isn’t level, parts of it will be too close or too far from the extruder, and your print job will likely fail. The method of leveling the bed can vary widely depending on the brand and model of the 3D printer you own.
More basic and less expensive printers use machine screws and springs to level the build surface, in which case leveling requires a small screwdriver and a spirit level.
Here’s how to level the build surface:
- Place the level on the build surface aligned in either the X or Y direction.
- Adjust the machine screws until the bubble in the spirit level is centered.
- Repeat for the other direction.
More advanced and expensive printers are usually designed with self-leveling work surfaces. There will be a leveling function in the printer software.
- Treat the Build Surface
To get the filament to adhere to the build surface, it’s a good idea to cheat a little. You can treat the build surface with some mildly adhesive material to give the filament some extra encouragement to stick to the build surface.
Common treatments include Elmer’s glue stick, cheap hairspray, and painter’s tape. If you use painter’s tape, it’s best to use an extra-wide roll to avoid overlapping edges.
You might also consider substituting the stock build surface for one made of a different, more specialized material. Simplify 3D suggests BuildTak or a sheet of polyetherimide (PEI) plastic.
- Print a Test Object
In the end, the only way to be absolutely sure that you have your 3D printer prepared correctly is to print something. This test object can be a copy of your intended print job or something simpler like a cube or other platonic solid.
The goal here isn’t necessary to run the test print to completion, and in all likelihood, you’ll start and abort several test prints before one comes out just right. Between attempts, you should scrape and wipe down the build surface.
Conclusion
3D printing a custom-made object is not as simple as you might expect. Getting a perfect first layer and an ultimately successful print requires the proper calibration and preparation of your printer. Following the tips mentioned above can get you a long way toward nailing your print job.
- Written by:
- Ben
- Last updated:
- 10/17/2023
About Ben
I started 3D printing since 2013 and have learned a lot since then. Because of this I want to share my knowledge of what I have learned in the past years with the community. Currently I own 2 Bambulab X1 Carbon, Prusa SL1S and a Prusa MK3S+. Hope you learn something from my blog after my years of experience in 3D printing.